
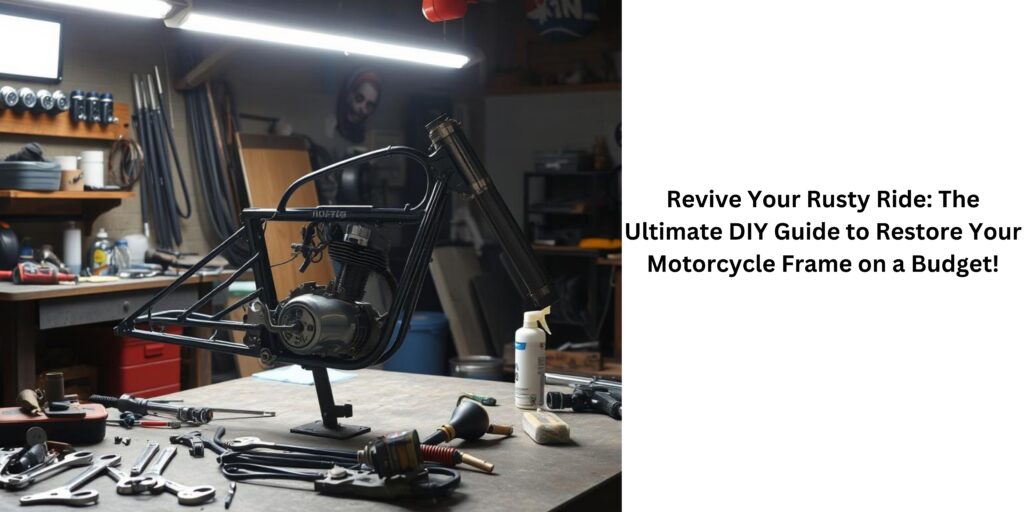
Introduction
Your motorcycle is more than a machine—it’s a passion, an art piece, and sometimes part of your family history. Over time, frames can wear out, rust may develop, or you might want to restore that classic vintage look. Restoring your motorcycle frame revitalises your ride. It also helps you learn about your bike’s construction, saves money compared to buying a new frame, and allows you to customise your bike to match your style.In this guide, we will take you through the DIY motorcycle frame restoration process. We’ll cover preparing your workspace, gathering tools, and disassembling the bike. Next, we’ll clean and repair the frame. Then we’ll refinish it for a lasting look. Finally, we’ll help you reassemble your motorcycle with care. Whether you’re restoring a vintage gem or your daily ride, this step-by-step guide will unlock your motorcycle’s full potential.
Why Restore Your Motorcycle Frame?
Restoring your motorcycle frame can bring many benefits, and here’s why you might want to consider it:
- Cost Savings: A DIY restoration project can be far less expensive than buying a brand-new frame or hiring a professional.
-
- Preserve History: Restoring your vintage or classic motorcycle keeps its character and history alive.
- Customization: You can customize the frame to your liking—choose a unique colour, finish, or minor design changes.
- Safety: Repairing structural issues like cracks, bends, or rust boosts your bike’s safety and lifespan.
- Skill Building: The project teaches you more about your motorcycle’s mechanics and can be a rewarding learning experience.
Preparing Your Workspace and Tools
Before you start working on your motorcycle frame, you need to set up a proper workspace and gather all the necessary tools. A well-organized workspace makes the job easier, keeps you safe, and improves the quality of your restoration.
Read more:
Setting Up Your Workspace
- Choose a Spacious Area: Find a large, well-lit, and clean area such as a garage or workshop. You should have plenty of room to move around your motorcycle frame.
- Clear the Clutter: Ensure your workspace is free of obstacles. A clutter-free area prevents accidents and allows you to keep your tools organized.
- Use a Strong Workbench: Invest in or use a sturdy workbench or table that can support the weight and size of your motorcycle frame.
- Proper Ventilation: Especially when sandblasting or painting, make sure your workspace is well-ventilated to avoid inhaling fumes and dust.
Gathering Your Tools
Make sure you have all the tools and safety gear before you begin. Here’s a list of some essential items:
- Mechanical Tools: Wrenches, screwdrivers, sockets, pliers, and a torque wrench.
- Cutting and Welding Tools: A grinder, welder, and metal-cutting saw.
- Sandblasting Equipment: A sandblaster, appropriate abrasives, and a compressor.
- Painting Supplies: A paint sprayer or brushes, quality primer, paint (or powder coat), and clear protective finish.
- Safety Gear: Gloves, safety goggles, a respirator mask, ear protection, and appropriate clothing.
- Other Supplies: Degreaser, solvents, sanding papers (various grits), and cleaning cloths.
By preparing your workspace and tools well in advance, you’ll be setting the stage for a smooth and successful restoration project.
Disassembling Your Motorcycle Frame
The first major step in restoring your motorcycle frame is to disassemble your bike. This lets you work on the frame without interference from other parts. It also gives you a chance to inspect all components for wear and damage.
Step 1: Removing the Engine and Other Components
- Document the Process: Before taking anything apart, take photos or label the parts. This will help you during reassembly.
- Remove the Engine: Disconnect and remove the engine along with attached components such as the carburetor and fuel tank. Work slowly and methodically.
- Detach Electrical Components: Carefully remove the wiring harness, sensors, and any electrical connections. Keep them organized to avoid confusion later.
Step 2: Separating the Frame from the Swingarm
- Secure the Bike: Use jack stands or a lift to securely support the motorcycle.
- Disconnect the Rear Suspension: Remove the pivot bolts and disconnect the rear suspension linkage from the swingarm. Remember to support both the frame and swingarm to prevent damage.
- Document Everything: Again, take notes or photos of the connections to help you reassemble the frame later.
Taking your time during disassembly ensures that you do not lose any parts and makes the reassembly process much easier. It also gives you a chance to inspect the frame thoroughly.
Sandblasting and Cleaning the Frame
Once your motorcycle frame is completely disassembled, it’s time to clean it up. The goal here is to remove old paint, rust, and dirt so that you can inspect and repair any damage.
Sandblasting Your Frame
Sandblasting is an effective method to strip away old layers of paint and rust. Here’s how to do it safely and effectively:
- Safety First: Always wear a respirator mask, safety goggles, and thick gloves when sandblasting. This protects you from harmful dust and debris.
- Set Up in a Ventilated Area: Ensure your workspace is open or use proper ventilation to avoid inhaling particles.
- Test a Small Area: Before you start, test the sandblaster on a small, inconspicuous area of the frame to ensure the settings are correct.
- Even Coverage: Hold the sandblaster at a consistent angle and distance from the surface. Move steadily to avoid gouging the metal.
- Clean Thoroughly: Make sure to cover every part of the frame. The aim is to reveal clean, bare metal that is free of rust and old paint.
Cleaning and Degreasing
After sandblasting, there might be leftover dust and debris. Follow these steps:
- Wipe Down the Frame: Use a clean cloth and a degreaser to remove any residual particles.
- Inspect the Surface: Look closely at the metal for any signs of damage or areas that might need additional cleaning.
- Allow to Dry: Let the frame dry completely before moving on to the next stage.
A clean, bare metal surface is critical for the repair and refinishing processes. It ensures that any new coatings adhere properly and last a long time.
Inspecting and Repairing Damage
Now that your frame is clean, inspect it carefully for any damage. Look for dents, cracks, bends, or holes that could affect the bike’s safety and performance.
Identifying Common Issues
- Rust: Look for any remaining signs of rust that might have been hidden under layers of paint.
- Cracks and Holes: Small cracks or holes need to be repaired immediately to prevent further damage.
- Bent or Twisted Sections: Over time, accidents or wear and tear may have caused the frame to bend or twist.
Repairing the Frame
Straightening Bent or Twisted Sections
- Use the Right Tools: Tools such as a frame straightening jig or a hydraulic press can help restore the correct alignment.
- Measure Carefully: Use a straightedge or alignment tool to ensure that the frame is completely straight. Even minor misalignments can affect handling and safety.
- Work Slowly: Gradually apply pressure and check your progress often.
Welding Cracks and Holes
- Clean the Area: Make sure the area around any crack or hole is free from dirt, oil, or rust.
- Prepare the Surface: Sand the area lightly to ensure a good bond with the new weld.
- Weld Carefully: If you’re not experienced with welding, consider practicing on scrap metal first or seeking advice from a professional. Make sure the weld is strong and smooth.
- Inspect the Welds: After welding, check the repaired areas thoroughly to ensure they are solid and free of defects.
Repairing your frame carefully is essential. A strong, well-repaired frame will keep you safe on the road and ensure your bike performs as it should.
Refinishing Your Motorcycle Frame
With all repairs complete, the next step is to refinish your motorcycle frame. A good finish not only makes your bike look great but also protects it from future rust and damage.
Preparing the Surface for Painting
- Degrease Again: Even after cleaning, run a final degreaser over the entire frame to remove any oils or contaminants.
- Sanding: Sand the frame using finer grits of sandpaper to create a smooth surface. This helps the primer and paint adhere better.
- Apply a Primer: Use a quality metal primer to coat the frame. Primer helps to seal the surface and ensures that your final coat of paint will look uniform and last longer.
- Dry Time: Allow the primer to dry fully according to the manufacturer’s instructions.
Painting and Finishing
- Choose Your Finish: Decide whether you want to use spray paint, a paint sprayer, or even a powder coat. Each method has its benefits—spray painting is easier for beginners, while powder coating gives a professional finish.
- Apply Multiple Coats: For the best result, apply at least two coats of paint, allowing proper drying time between each layer.
- Protective Top Coat: Once the paint has dried, add a clear protective top coat. This helps guard against scratches, UV rays, and future rust.
Taking your time during the refinishing stage pays off with a professional-looking finish that not only looks great but also protects your motorcycle frame for years to come.
Reassembling the Restored Frame
After the paint and final touches are complete, it’s time to reassemble your motorcycle. This is a crucial phase because every component must be reattached correctly to ensure safe and reliable performance.
Frequently Asked Questions (FAQ)
Q1: Why should I restore my motorcycle frame instead of buying a new one?
A1: Restoring your motorcycle frame saves you money and preserves the unique history of your bike. It also allows you to customize the design to your personal taste while improving safety by fixing any structural issues.
Q2: What are the main benefits of a DIY frame restoration project?
A2: A DIY restoration project is cost-effective, educational, and deeply satisfying. You’ll learn more about your motorcycle’s mechanics, improve your repair skills, and create a personalized ride that stands out from the rest.
Q3: How do I prepare my workspace for a frame restoration project?
A3: Choose a spacious, well-lit area such as a garage. Clear any clutter, set up a strong workbench, ensure proper ventilation, and gather all the necessary tools and safety gear before starting the project.
Q4: What safety precautions should I take when sandblasting my motorcycle frame?
A4: Always wear safety goggles, a respirator mask, and gloves. Work in a well-ventilated area, and test the sandblaster on a small section of the frame before proceeding with the entire surface.
Step-by-Step Reassembly
- Reinstall the Engine: Carefully place the engine back into the frame. Refer to your documentation and photos from the disassembly process. Secure it with the correct fasteners and tighten them to the manufacturer’s specifications.
- Reconnect Electrical and Fuel Systems: Reattach all wiring, sensors, and fuel lines. Make sure each connection is secure and properly routed.
- Attach the Swingarm and Suspension: Align the swingarm with the frame and reinstall it. Double-check that the pivot bolts and suspension linkage are correctly fastened.
- Check Alignment: Use a straightedge or alignment tool to ensure that the frame and all attached components are properly aligned. Even a small misalignment can affect handling and safety.
- Tighten All Fasteners: Go over every bolt, nut, and screw to make sure they are tight. This step is crucial for the overall integrity of your motorcycle.
Take your time during reassembly. Carefully following each step will ensure your motorcycle is safe and ready for the road.
Final Touches and Maintenance
Once your motorcycle is fully reassembled, there are a few final touches to add and a maintenance plan to put in place.
Adding the Final Touches
- Inspect for Loose Parts: Double-check that all components are securely attached and that there are no loose bolts or connections.
- Lubricate Moving Parts: Apply oil or lubricant to moving parts such as suspension pivots and chain mechanisms. This not only improves performance but also extends the life of these parts.
- Clean and Polish: Give your newly restored frame a final clean. Remove any dust or fingerprints, and polish the surface to bring out the shine.
- Protective Coating: Consider adding an extra layer of protective coating if you expect to ride in harsh conditions. This will help maintain the quality of your paint job and prevent future rust.
Establishing a Maintenance Routine
To keep your motorcycle looking and running like new, establish a regular maintenance routine:
- Regular Inspections: Check the frame and other components for signs of wear, damage, or rust every few months.
- Clean After Rides: Especially if you ride in wet or dusty conditions, clean your motorcycle regularly to remove dirt and debris.
- Periodic Lubrication: Keep all moving parts lubricated as recommended in your motorcycle’s manual.
- Touch-Ups: Carry out minor touch-ups on paint or repairs as soon as you notice any issues.
By maintaining your motorcycle properly, you can ensure that your hard work in restoring the frame lasts for many years and rides safely on the road.
Conclusion
Restoring your motorcycle frame is a rewarding project. It mixes practical skills with your love for riding. With careful planning and patience, you can turn an old, worn-out frame into a stunning piece. You’ll save money and gain valuable experience. Plus, you’ll feel proud knowing you revived your motorcycle with your own hands.
From setting up your workspace to the final reassembly, each step of the process is an opportunity to learn and improve. Whether you’re a beginner or a seasoned DIY enthusiast, this guide is designed to help you achieve a professional finish. Enjoy the journey, be safe, and most importantly, have fun riding your newly restored bike!